Spring with RabbitMQ
Pre Requirements
- RabbitMQ 3.6
RabbitMQ 설치(Docker)
RabbitMQ를 물리 서버에 설치하기 위해서는 Erlang 설치를 선행한 후 RabbitMQ를 설치해야 하지만 테스트 용도이기 때문에 Docker로 설치 진행한다.
Docker Hub의 RabbitMQ 페이지를 참고하여 설치.
이미지 Pull
docker pull rabbitmq 명령어를 이용하여 이미지 다운로드. 최신 버전이 아닌 3.6 버전을 사용할 예정이므로 docker pull rabbitmq:3.6-management을 통해 pull을 진행한다.(:3.6을 붙이지 않으면 latest가 다운로드 되기 때문에 반드시 버전을 명시, management plugin을 사용하기 위해서는 버전 뒤에 -management suffix를 붙여주어야 한다)
leeyh0216@leeyh0216-pc:~$ docker pull rabbitmq:3.6-management
3.6-management: Pulling from library/rabbitmq
...생략
Status: Downloaded newer image for rabbitmq:3.6-management
Container 실행
docker run 명령어를 통해 RabbitMQ Container를 실행한다. hostname, port binding은 아래와 같이 구성
- hostname: rabbitmq
- port binding: 5672:5672(rabbitmq 서버), 15672:15672(management plugin web)
docker run -d --hostname rabbitmq --p 5672:5672 -p 15672:15672 --name rabbitmq rabbitmq:3.6-management
위 명령어를 실행한 후 docker ps -a를 확인해보면 정상적으로 RabbitMQ Container가 동작 중인 것을 확인할 수 있다.
 CONTAINER ID        IMAGE                     COMMAND                  CREATED             STATUS                     PORTS                                                                                        NAMES
2e27d8eb1cd3        rabbitmq:3.6-management   "docker-entrypoint.s…"   2 minutes ago       Up 2 minutes               4369/tcp, 5671/tcp, 0.0.0.0:5672->5672/tcp, 15671/tcp, 25672/tcp, 0.0.0.0:15672->15672/tcp   rabbitmq
Spring Boot RabbitMQ Tutorial
Spring Boot RabbitMQ 페이지를 참고하여 진행한다.
build.gradle 구성
사용한 의존성은 아래와 같으며, JDK 1.8 기준으로 프로젝트를 생성한다.
- spring-boot-starter: 1.4.6
- spring-boot-starter-web: 1.4.6
- spring-boot-starter-amqp: 1.4.6
build.gradle
apply plugin: 'java'

sourceCompatibility = 1.8
targetCompatibility = 1.8

repositories {
    mavenCentral()
}

dependencies {
    compile group: 'org.springframework.boot', name: 'spring-boot-starter', version: '1.4.6.RELEASE'
    compile group: 'org.springframework.boot', name: 'spring-boot-starter-web', version: '1.4.6.RELEASE'
    compile group: 'org.springframework.boot', name: 'spring-boot-starter-amqp', version: '1.4.6.RELEASE'

    testCompile "junit:junit:4.12"
}
코드 구성
Spring Boot RabbitMQ Getting Started 페이지의 예제를 약간 변형하여 사용하였다.
아래 4개의 클래스를 구현한다.
ReceiverConfiguration: RabbitMQ <-> Spring Boot 간 Connection 설정 및 Receiver 클래스에게 메시지를 전달하기 위한 Listener Container Factory 설정Receiver: 수신한 메시지를 처리할 클래스SampleMessage: 메시지 포맷 정의ReceiverApplication: SpringBoot Application Entry Point
ReceiverConfiguration 클래스
package com.leeyh0216.rabbitmq.receiver;


import org.springframework.amqp.core.Binding;
import org.springframework.amqp.core.BindingBuilder;
import org.springframework.amqp.core.Queue;
import org.springframework.amqp.core.TopicExchange;
import org.springframework.amqp.rabbit.config.SimpleRabbitListenerContainerFactory;
import org.springframework.amqp.rabbit.connection.CachingConnectionFactory;
import org.springframework.amqp.rabbit.connection.ConnectionFactory;
import org.springframework.amqp.support.converter.Jackson2JsonMessageConverter;
import org.springframework.context.annotation.Bean;
import org.springframework.context.annotation.Configuration;

@Configuration
public class ReceiverConfiguration {

    private static final String RABBITMQ_HOST = "localhost";
    private static final int RABBITMQ_PORT = 5672;

    private static final String USERNAME = "guest";
    private static final String PASSWORD = "guest";

    private static final String ROUTING_KEY = "test-topic-1.*";
    private static final String EXCHANGE_NAME = "test-exchange-1";
    private static final String QUEUE_NAME = "test-queue-1";

    /**
     * RabbitMQ Server와의 Connection을 생성하는 Factory 객체를 반환한다.
     *
     * @return 초기화된 RabbitMQ ConnectionFactory 객체
     */
    @Bean
    public ConnectionFactory getConnectionFactory(){
        ConnectionFactory connectionFactory = new CachingConnectionFactory(RABBITMQ_HOST, RABBITMQ_PORT);
        ((CachingConnectionFactory) connectionFactory).setUsername(USERNAME);
        ((CachingConnectionFactory) connectionFactory).setPassword(PASSWORD);
        return connectionFactory;
    }

    /**
     * RabbitMQ에서 사용할 Exchange를 선언하고 반환한다.
     * Exchange 종류는 Topic 사용
     *
     * @return 초기화된 TopicExchange 객체
     */
    @Bean
    public TopicExchange getExchange(){
        return new TopicExchange(EXCHANGE_NAME);
    }

    /**
     * RabbitMQ에서 사용할 Queue를 선언하고 반환한다.
     *
     * @return 초기화된 Queue 객체
     */
    @Bean
    public Queue queue(){
        return new Queue(QUEUE_NAME, true);
    }

    /**
     * Exchange와 Queue를 연결하는 Binding 객체를 선언하고 반환한다.
     *
     * @param queue 초기화된 Queue
     * @param exchange 초기화된 TopicExchange
     * @return Binding 객체
     */
    @Bean
    public Binding getBinding(Queue queue, TopicExchange exchange){
        return BindingBuilder.bind(queue).to(exchange).with(ROUTING_KEY);
    }

    /**
     * RabbitMQ에서 메시지를 수신할 Listener의 Factory를 선언하고 반환한다.
     *
     * @param connectionFactory ConnectionFactory 객체
     * @param converter Jackson Converter 객체. byte[] <-> 메시지 간 변환을 담당
     * @return 초기화된 Listener Factory 객체
     */
    @Bean("SampleContainerFactory")
    SimpleRabbitListenerContainerFactory getSampleContainerFactory(ConnectionFactory connectionFactory, Jackson2JsonMessageConverter converter) {
        SimpleRabbitListenerContainerFactory factory = new SimpleRabbitListenerContainerFactory();
        factory.setConnectionFactory(connectionFactory);
        factory.setMessageConverter(converter);
        return factory;
    }

    @Bean
    public Jackson2JsonMessageConverter getMessageConverter() {
        return new Jackson2JsonMessageConverter();
    }
}
RabbitMQ는 기본 설정 시 아래와 같은 연결 정보를 사용한다.
- Host: localhost
- Port: 5672
- User: guest
- Password: guest
기본적인 함수나 객체의 의미는 주석처리하였으며, RabbitMQ 개념을 다음 글에서 정리하고, 이를 다시 Spring boot amqp 와 매핑하는 과정을 그 다음글에서 정리할 예정
Receiver 클래스
package com.leeyh0216.rabbitmq.receiver;

import org.slf4j.Logger;
import org.slf4j.LoggerFactory;
import org.springframework.amqp.rabbit.annotation.RabbitListener;
import org.springframework.stereotype.Component;

@Component
public class Receiver{

    private static final Logger logger = LoggerFactory.getLogger(Receiver.class);

    /**
     * 메시지 수신 시 처리할 Handler 함수
     * @param message RabbitMQ의 test-queue-1으로부터 수신한 메시지
     */
    @RabbitListener(containerFactory = "SampleContainerFactory", queues="test-queue-1")
    public void onReceiveMessage(SampleMessage message){
        logger.info("Receiver received message: {}", message);
    }

}
RabbitMQ로부터 메시지를 수신하여 처리할 Handler 함수를 포함하는 클래스이다.
SampleMessage 클래스
package com.leeyh0216.rabbitmq.receiver;

import com.fasterxml.jackson.databind.ObjectMapper;

import java.io.Serializable;


public class SampleMessage implements Serializable {
    private String name;
    private String content;

    public String getName() {
        return name;
    }

    public void setName(String name) {
        this.name = name;
    }

    public String getContent() {
        return content;
    }

    public void setContent(String content) {
        this.content = content;
    }

    @Override
    public String toString(){
        try {
            return new ObjectMapper().writeValueAsString(this);
        }
        catch(Exception e){
            System.out.println("err to parsing");
            return "";
        }
    }
}
ReceiverApplication 클래스
package com.leeyh0216.rabbitmq.receiver;

import org.springframework.boot.SpringApplication;
import org.springframework.boot.autoconfigure.SpringBootApplication;
import org.springframework.context.annotation.ComponentScan;

@SpringBootApplication
@ComponentScan("com.leeyh0216.rabbitmq.receiver")
public class ReceiverApplication {

    public static void main(String[] args) throws InterruptedException {
        SpringApplication.run(ReceiverApplication.class, args);
    }

}
실행해보기
Sender의 경우 구현하지 않고 일단 RabbitMQ Web Management에서 메시지를 보내보기로 했다.
Application을 구동하면 아래와 같이 로그에 RabbitMQ 연결 정보와 함께 정상적으로 연결되었다는 메시지가 출력되는 것을 볼 수 있다.
  .   ____          _            __ _ _
 /\\ / ___'_ __ _ _(_)_ __  __ _ \ \ \ \
( ( )\___ | '_ | '_| | '_ \/ _` | \ \ \ \

 \\/  ___)| |_)| | | | | || (_| |  ) ) ) )
  '  |____| .__|_| |_|_| |_\__, | / / / /
 =========|_|==============|___/=/_/_/_/
 :: Spring Boot ::        (v1.4.6.RELEASE)
 2018-12-30 14:27:37.088  INFO 10680 --- [cTaskExecutor-1] o.s.a.r.c.CachingConnectionFactory       : Created new connection: SimpleConnection@32b38058 [delegate=amqp://guest@127.0.0.1:5672/, localPort= 50732]
2018-12-30 14:27:37.223  INFO 10680 --- [           main] s.b.c.e.t.TomcatEmbeddedServletContainer : Tomcat started on port(s): 8080 (http)
2018-12-30 14:27:37.230  INFO 10680 --- [           main] c.l.r.receiver.ReceiverApplication       : Started ReceiverApplication in 5.807 seconds (JVM running for 6.494)
이제 RabbitMQ Web Management 페이지로 가서 메시지를 보내보도록 하자. 접속은 http://localhost:15672로 할 수 있고, 초기 사용자와 패스워드는 guest, guest이다.
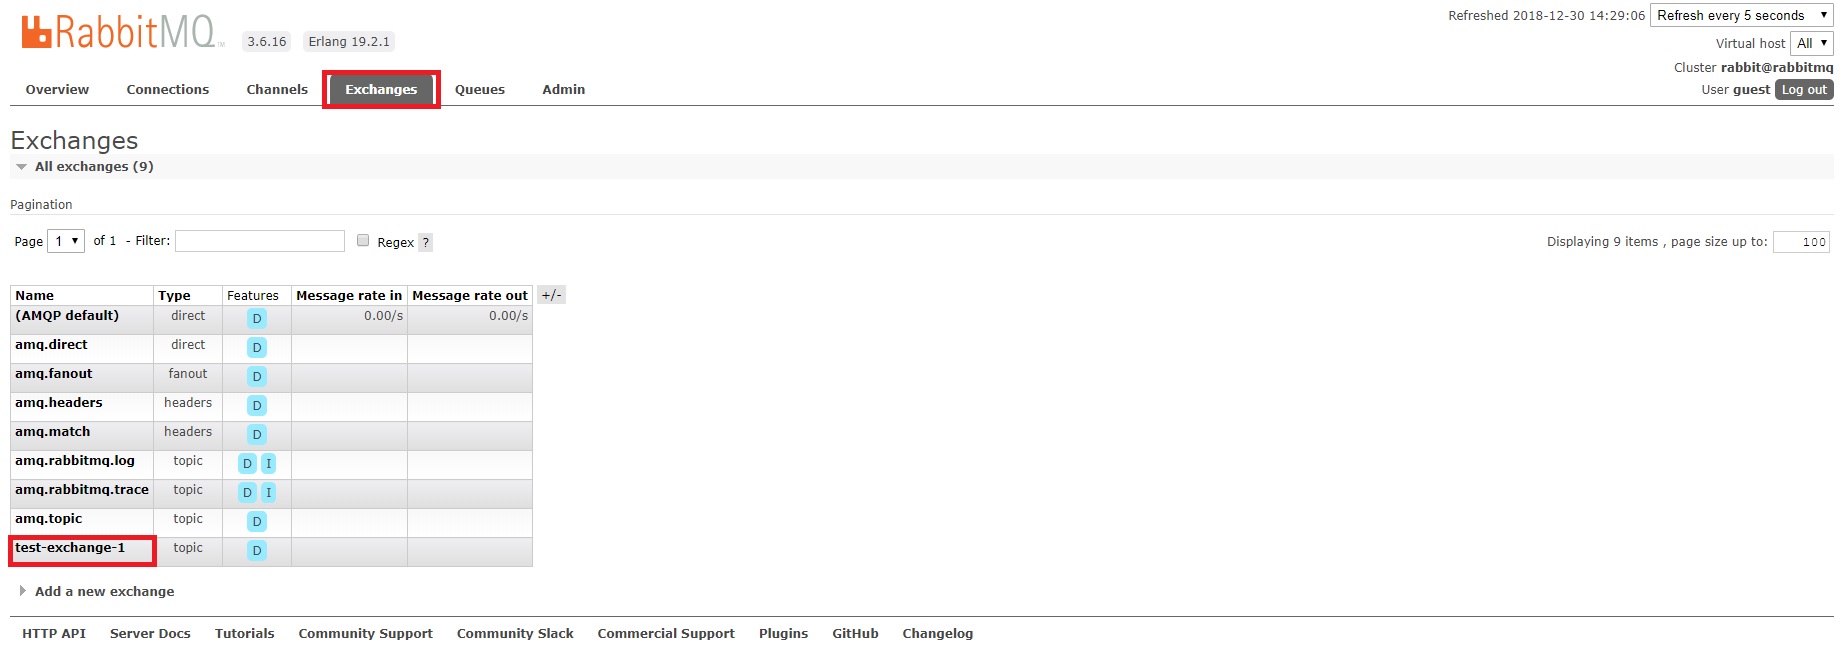
아래와 같이 Exchange에 우리가 선언한 test-exchange-1 Exchange가 생성되어 있는 것을 확인할 수 있다.
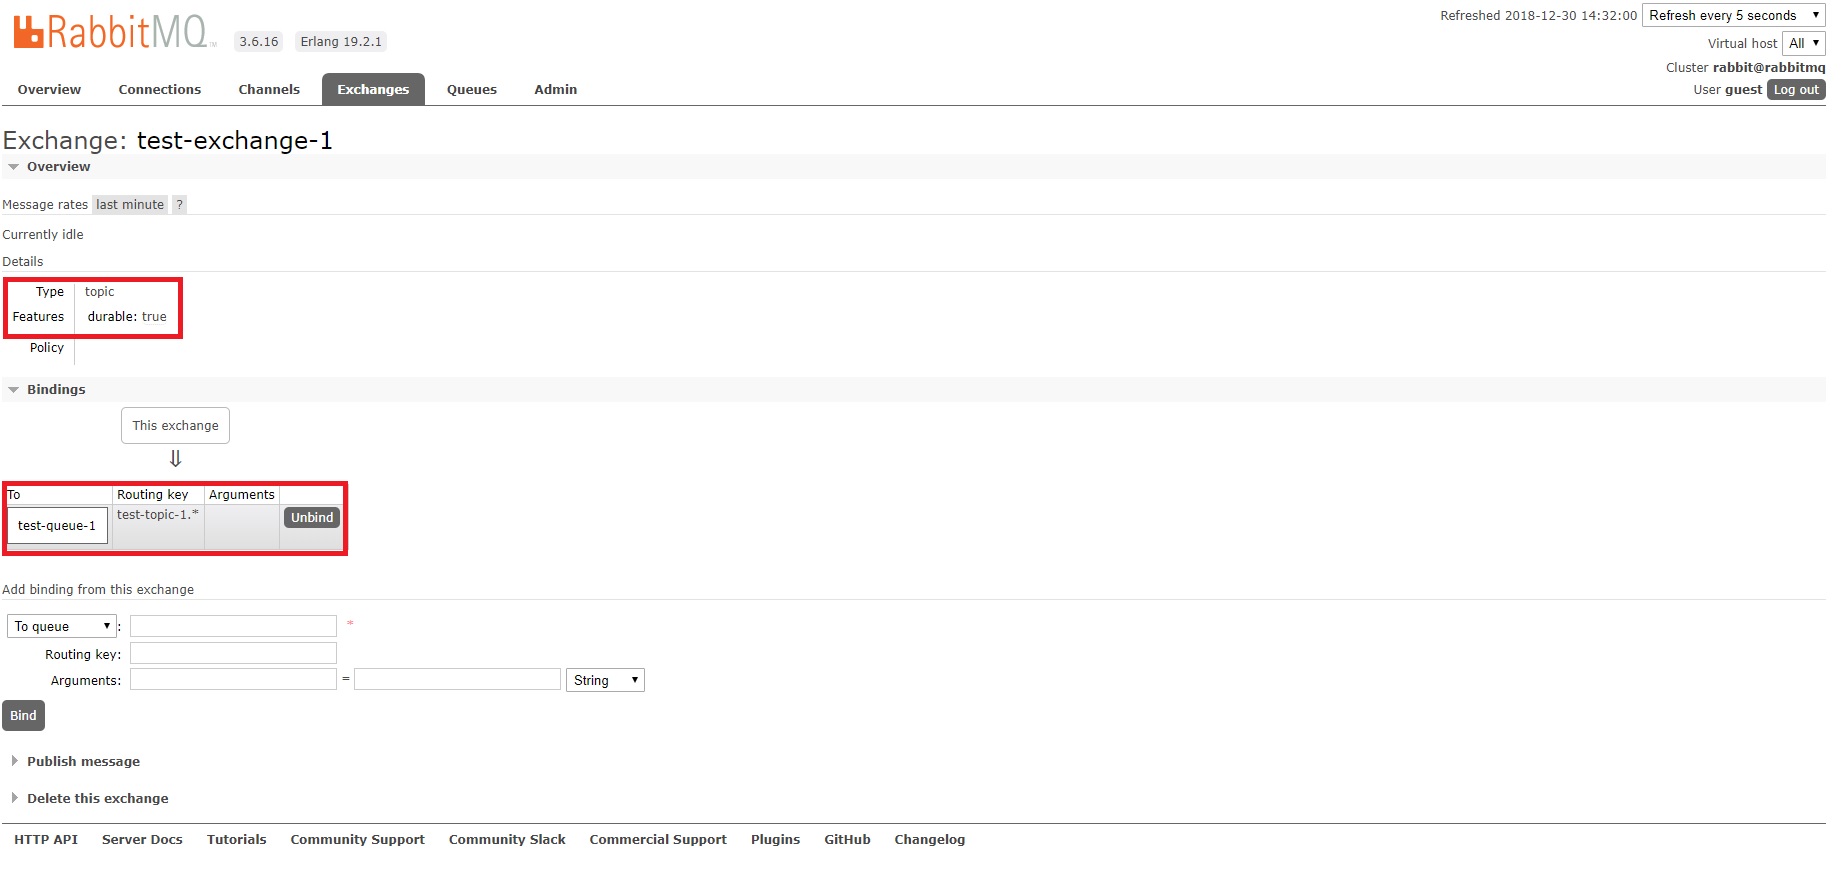
test-exchange-1을 클릭해보면 아래와 같이 해당 Exchange의 타입(topic)과 Binding을 확인할 수 있다.
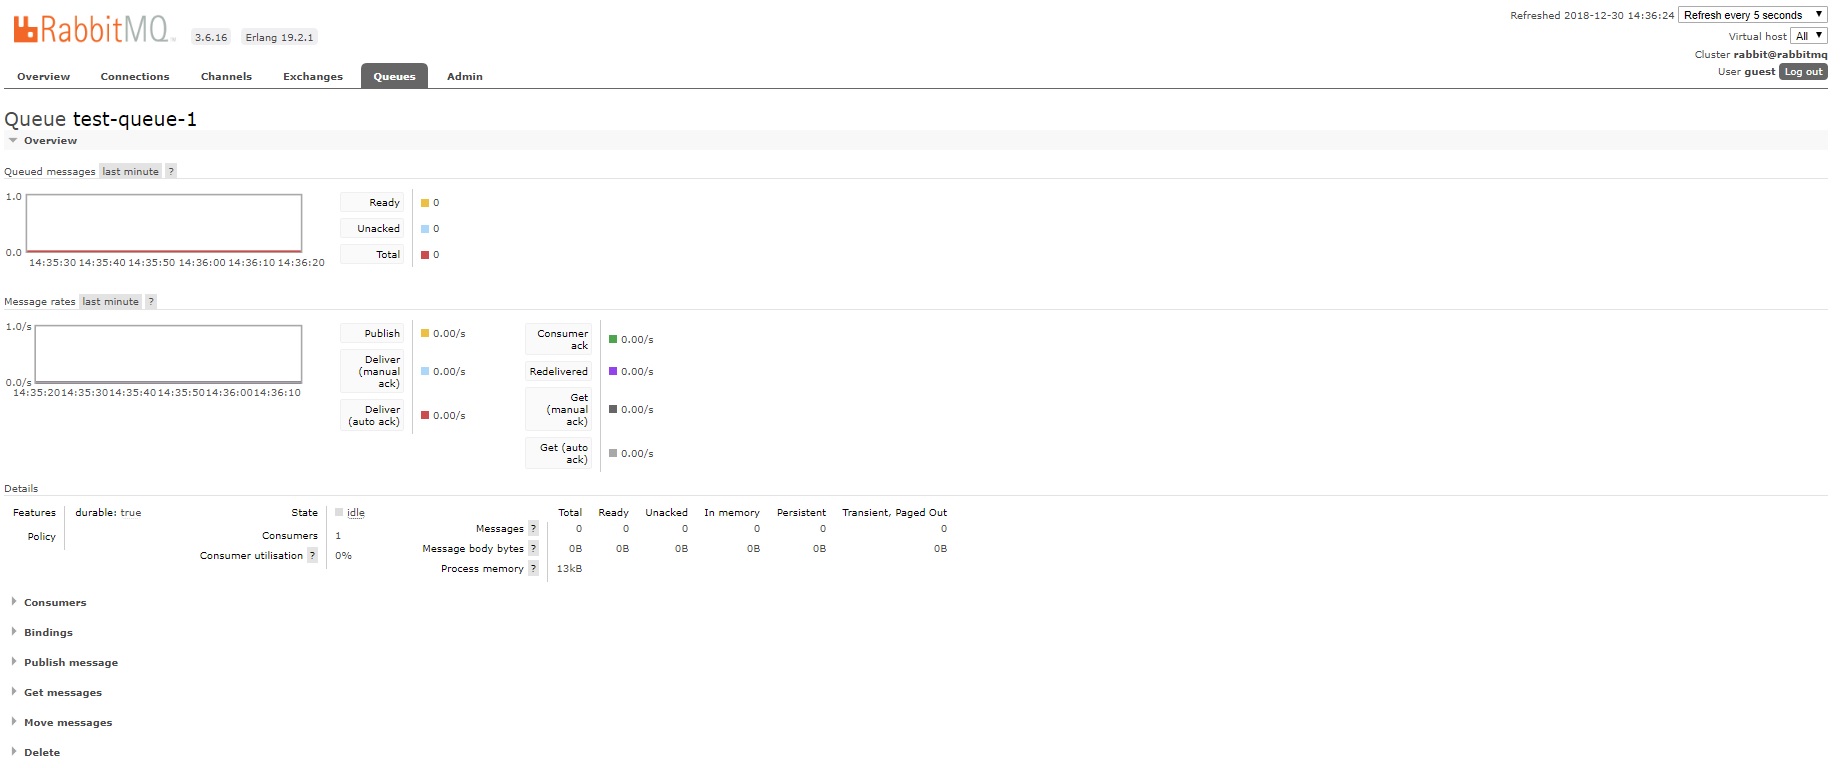
Queues 페이지를 들어가보면 우리가 선언한 test-queue-1이 생성되어 있는 것을 확인할 수 있다.

test-queue-1을 클릭해보면 해당 Queue의 정보 확인, 메시지 송/수신 등 Queue에 대한 기능을 수행할 수 있다.
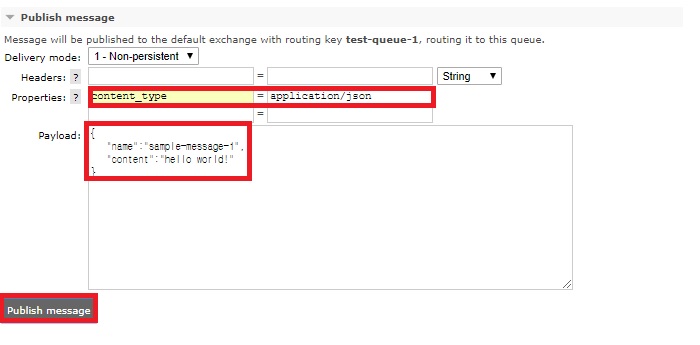
이제 큐에 메시지를 보내보도록 하자. 아래와 같이 Publish message 탭을 눌러 메시지를 작성한 후 전송해보자. 이 때 properties에는 아래와 같이 content_type을 application/json으로 설정해주어야 한다.
우리가 띄워놓은 Application의 로그를 확인해보면, 아래와 같이 방금 Publish한 메시지의 내용을 출력한 것을 확인할 수 있다.
2018-12-30 14:38:11.986 INFO 10680 --- [cTaskExecutor-1] c.leeyh0216.rabbitmq.receiver.Receiver : Receiver received message: {"name":"sample-message-1","content":"hello world!"}