- Airflow 튜토리얼 실행해보기
- Airflow 기본 개념 - DAG와 Operator
개요
Airflow를 사용할 일이 많아질 것 같아 사용법 정리 포스팅을 진행한다.
Ubuntu 환경에서 설치, 운영, 활용 실습을 진행하려 했으나, 시간도 넉넉하지 않고 Airflow 자체를 설치하거나 운영하기보다는 활용하는 법을 손에 익히는 일이 중요할 것 같아 Docker airflow라는 Github에 올라와 있는 Docker compose 파일을 사용하여 실습을 진행한다.
Airflow 실행
미리 준비해야할 사항
Docker Image로 만들어진 Airflow를 사용할 것이기 때문에 실행 환경에 Docker Engine과 Docker Compose가 미리 설치되어 있어야 한다.
실행 환경
- Macbook Pro Early 2015, Mojave 10.14.6
- Docker Desktop 2.1.0.5
- Docker Engine 19.03.5
- Docker Compose 1.24.1
Docker Compose로 Airflow 실행하기
Docker Hub에 올라와 있는 Dockerhub - puckel/docker-airflow 이미지를 Pull 한다.
1
> docker pull puckel/docker-airflow
Airflow 뿐만 아니라 Metadata Database로 사용되는 Postgresql과 CeleryExecutor를 사용하기 위한 Redis를 함께 실행하기 위해 Docker Compose로 실행해야 한다. 이 또한 [Github - puckel/docker-airflow]에 미리 정의된 Docker Compose 파일이 있기 때문에 아래와 같이 실행한다.
1
> git clone https://github.com/puckel/docker-airflow.git
Pull이 완료된 이후 docker-airflow 디렉토리로 접근해보면 아래와 같은 파일들이 존재하는 것을 확인할 수 있다.
1
2
3
Dockerfile                        config                            docker-compose-LocalExecutor.yml
LICENSE                           dags                              script
README.md                         docker-compose-CeleryExecutor.yml
우리가 사용할 Docker Compose 파일은 docker-compose-CeleryExecutor.yml이다. 해당 파일을 열어보면 실행할 Docker Container들과 사용할 포트, Volumn 경로 등이 지정되어 있는데, 필요하다면 수정하면 된다.(나는 8080포트가 이미 다른 프로세스에서 사용 중이라 Airflow Webserver의 Port mapping을 8080:8080에서 8081:8080으로 변경했다)
아래 명령어를 수행하여 Airflow Docker Image를 실행한다.
1
> docker-compose -f docker-compose-CeleryExecutor.yml up -d
정상적으로 실행된다면 아래와 같은 로그를 남기며 명령어가 종료될 것이다.
1
2
3
4
5
6
7
Removing docker-airflow_webserver_1
docker-airflow_redis_1 is up-to-date
docker-airflow_postgres_1 is up-to-date
docker-airflow_flower_1 is up-to-date
Starting 184bc6a95ed6_docker-airflow_webserver_1 ... done
Starting docker-airflow_scheduler_1              ... done
Starting docker-airflow_worker_1                 ... done
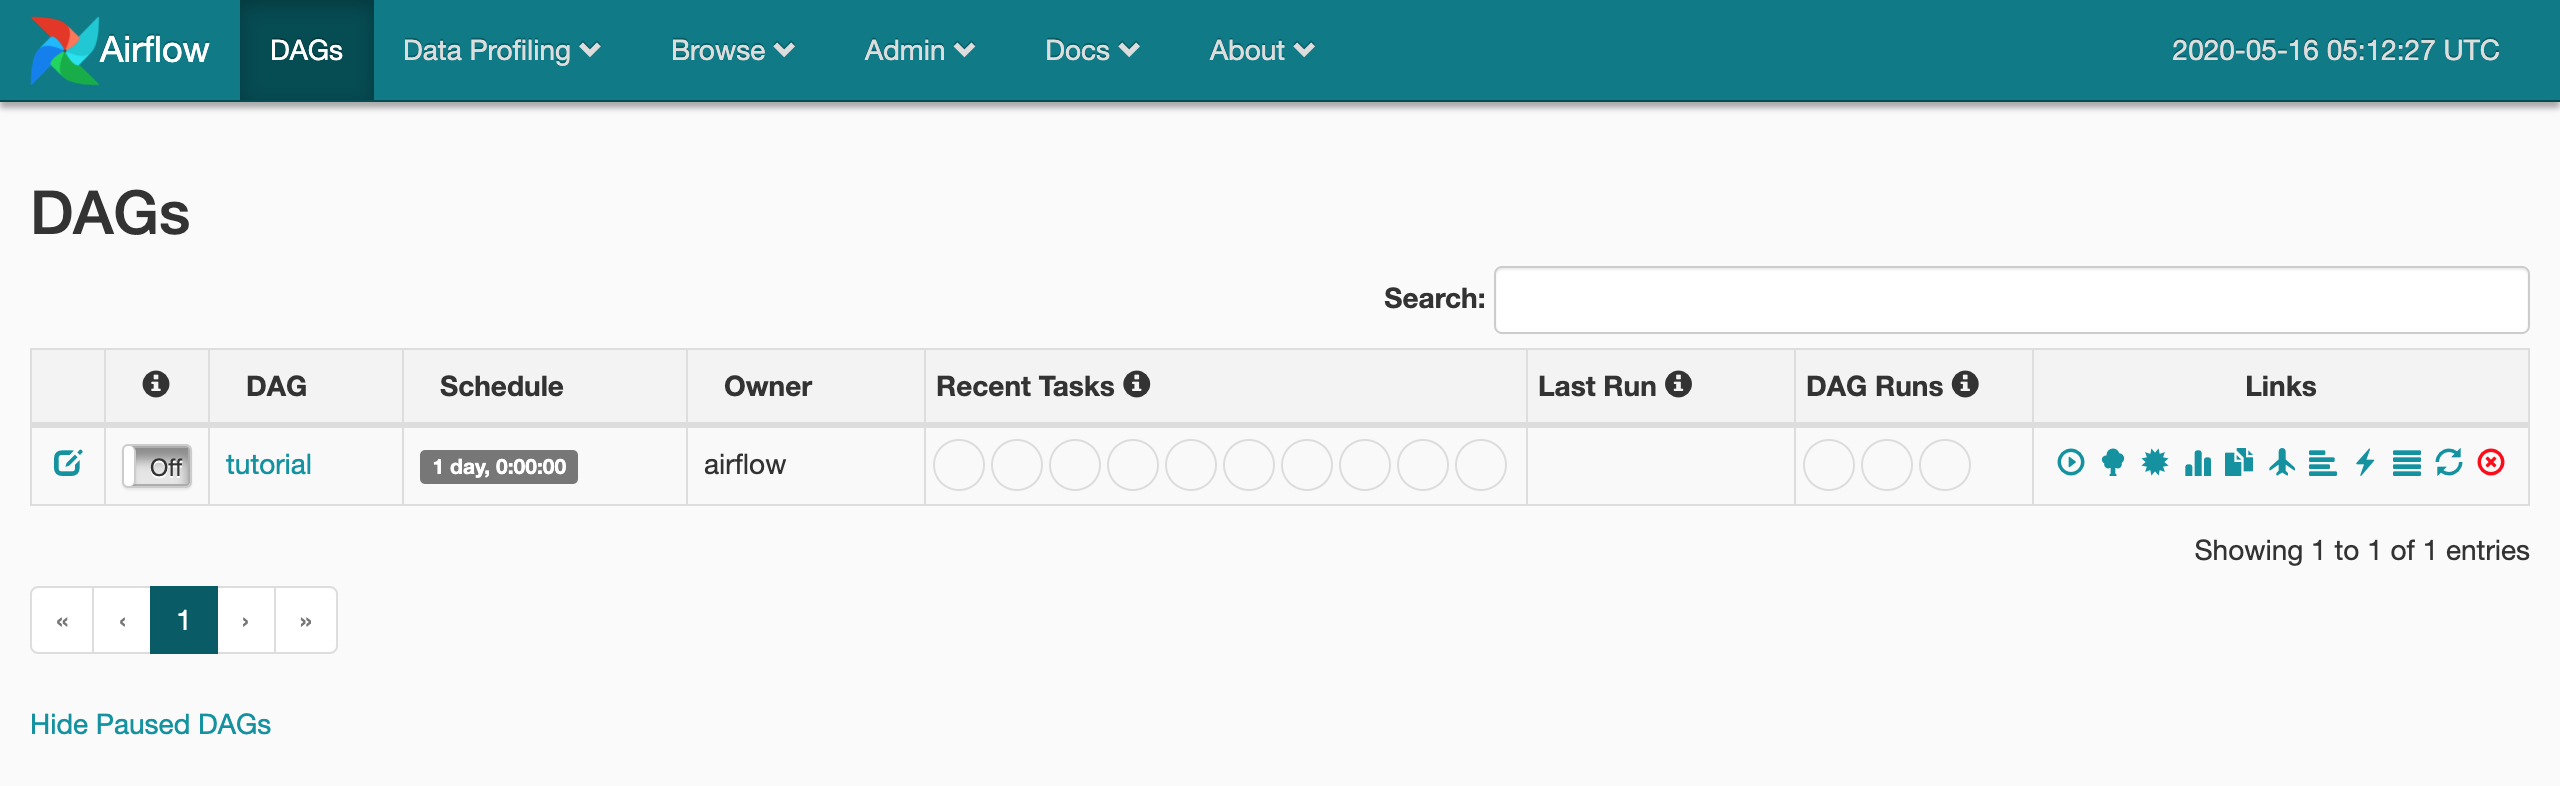
Airflow Webserver가 잘 떳는지 http://localhost:8080 주소로 들어가 확인해본다.
Airflow Tutorial 진행
Airflow Tutorial 페이지를 참고하여 Tutorial을 진행한다.
simple_bash.py DAG 파일 생성
simple_bash라는 이름의 DAG를 생성할 것이다. Docker Compose를 실행한 경로(다른 경로로 이동하지 않았다면 docker-airflow)에 dag라는 디렉토리가 있을 것이다. 이 디렉토리에 simple_bash.py 파일을 생성하고, 작성을 시작한다.
import 구문
1
2
3
from datetime import datetime, timedelta
from airflow import DAG
from airflow.operators.bash_operator import BashOperator
from airflow import DAG: 정의할 DAG에 매핑하는 클래스를 임포트한다.from airflow.operators.bash_operator import BashOperator: Bash 명령어를 실행할 Task Operator 클래스를 임포트한다.
Default Arguments 객체 생성
DAG 및 DAG 내 Task들에 일괄적으로 적용할 속성 객체를 작성한다.
1
2
3
4
5
6
7
8
9
10
default_args={
    'owner': 'airflow',
    'depends_on_past': False,
    'start_date': datetime(2020, 5, 16, 14, 0),
    'email': ['leeyh0216@gmail.com'],
    'email_on_failure': False,
    'email_on_retry': False,
    'retries': 1,
    'retry_delay': timedelta(minutes=1),
}
owner: 작업 소유자 IDdepends_on_past: 특정 작업의 Upstream이 성공한 경우에만 해당 작업을 Trigger할 것인지에 대한 여부start_date: DAG 최초 실행 시간(과거 혹은 예약 가능)email: 작업 실행 관련 이메일 수신 주소 목록email_on_failure: 작업 실패 시 이메일 수신 여부email_on_retry: 작업 재시도 시 이메일 수신 여부retries: 작업 재시도 횟수retry_delay: 작업 재시도 간격
DAG 정의
DAG 객체를 정의한다.
1
2
3
4
5
6
dag = DAG(
    'tutorial_bash',
    default_args=default_args,
    description='My first tutorial bash DAG',
    schedule_interval= '* * * * *'
)
schedule_interval: DAG 스케쥴링 간격(Cron 표현식 혹은 미리 정의된 속성 사용 가능)
Task 정의
“hello world”를 출력하는 작업(say_hello)과 현재 시간을 출력하는 작업(what_time)을 정의할 것이다.
1
2
3
4
5
6
7
8
9
10
11
12
13
t1 = BashOperator(
    task_id='say_hello',
    bash_command='echo "hello world"',
    dag=dag
)

t2 = BashOperator(
    task_id='what_time',
    bash_command='date',
    dag=dag
)

t1 >> t2
BashOperator에는 다음과 같은 속성이 존재한다.
task_id: 작업의 IDbash_command: 실행할 Bash Commanddag: 작업이 속할 DAG
또한 t1 >> t2는 t1이 실행된 후 t2를 실행한다는 의미이다.(t1이 t2의 Upstream Task)
Airflow CLI와 Webserver를 통해 생성된 DAG 확인하기
Airflow CLI로 방금 만든 DAG가 잘 반영되었는지 확인해보자. 원래는 airflow list_dags 명령어로 Airflow에 등록된 DAG 목록을 출력할 수 있는데, 여기서는 Docker Compose로 띄워 놓았기 때문에 airflow list_dags 명령어 앞에 docker-compose -f docker-compose-CeleryExecutor.yml run --rm webserver를 붙여주어야 한다.
1
2
3
4
5
6
7
> docker-compose -f docker-compose-CeleryExecutor.yml run --rm webserver airflow list_dags

-------------------------------------------------------------------
DAGS
-------------------------------------------------------------------
tutorial
tutorial_bash
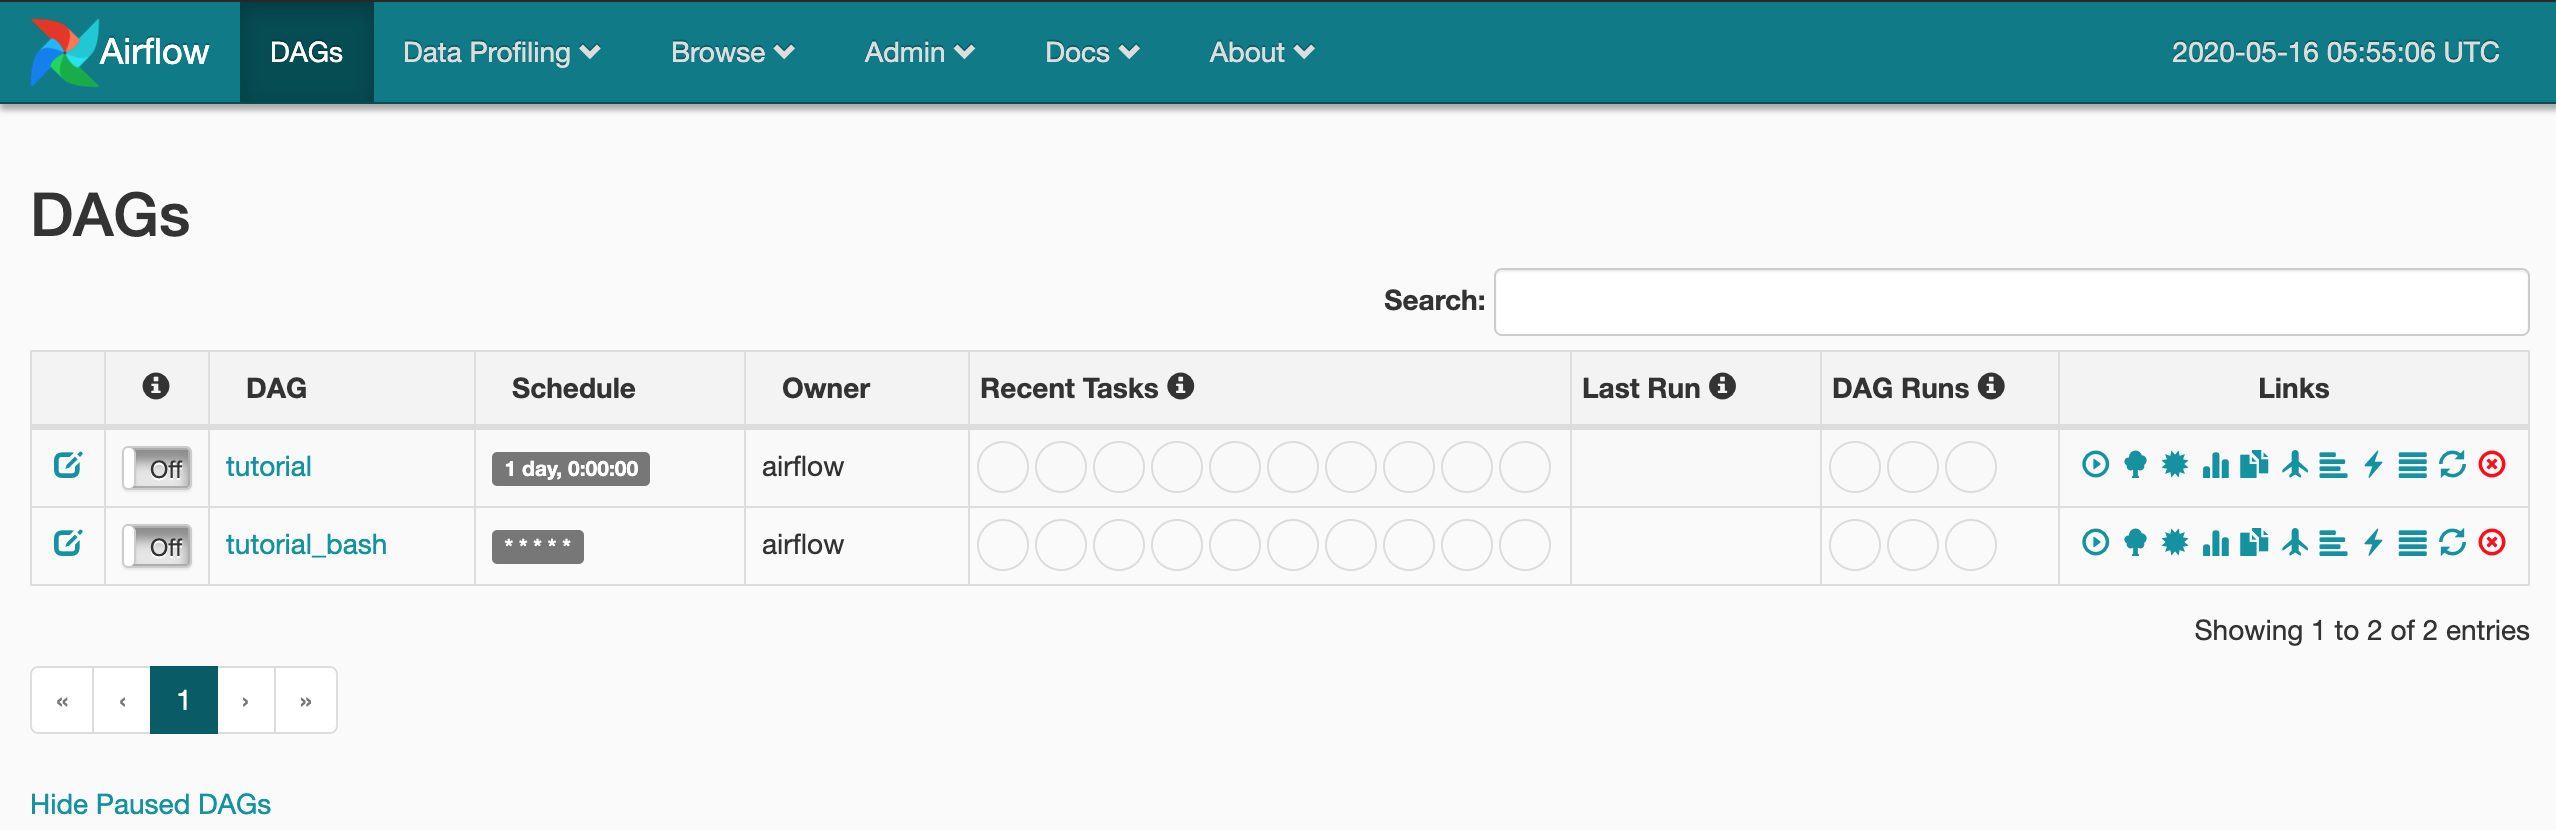
WebServer에서도 일정 시간이 지나면 아래와 같이 tutorial_bash가 만들어진 것을 확인할 수 있다.
DAG를 활성화하여 실행 확인하기
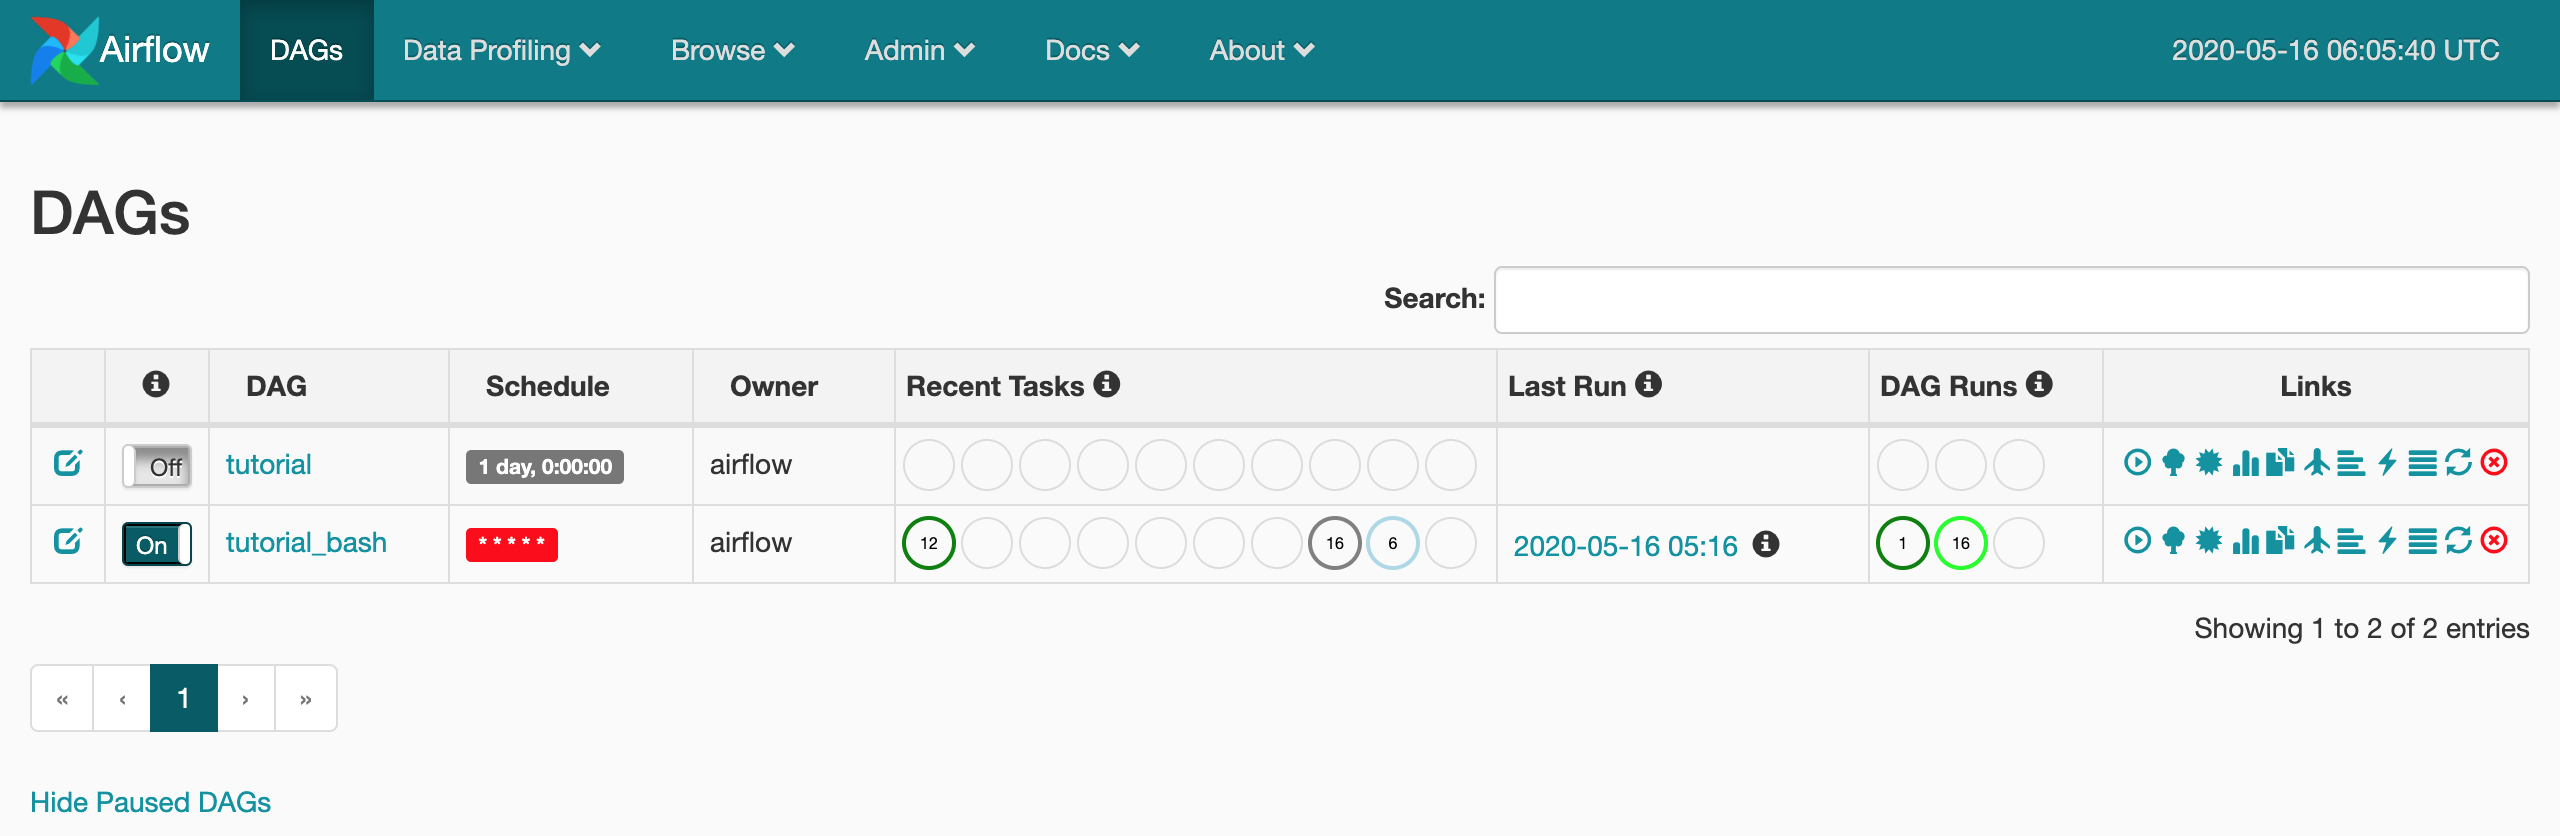
만들어진 DAG는 활성화된 상태가 아니어서(Paused) 실행되지 않는다. 실행을 위해서는 CLI나 Web UI 상에서 ‘Off’ 버튼을 눌러 ‘On’ 상태로 변경해주어야 한다.
CLI Command는 airflow unpause [DAG ID]로써 여기서는 Docker compose 명령어와 함께 아래와 같이 실행하면 된다.
1
2
3
4
> docker-compose -f docker-compose-CeleryExecutor.yml run --rm webserver airflow unpause tutorial_bash

[2020-05-16 06:04:41,772]  INFO - Filling up the DagBag from /usr/local/airflow/dags/tutorial_bash.py
Dag: tutorial_bash, paused: False
Web UI에서 확인하면 ‘Off’였던 상태가 ‘On’으로 변경되고, DAG가 실행되고 있는 것을 볼 수 있다.
정리
UI와 개념에 익숙해지지 않아 오래 걸렸는데, 며칠 만져보면 운영에 큰 지장이 없을 정도로 사용 가능할 것 같다.
다만 실제 운영 환경에서 Airflow를 구축할 때 dags 디렉토리의 동기화나 프로젝트 배포 등을 어떻게 할지가 참 궁금하다.